More on Setting up and installing the required EDA softwares
Enable Windows Subsystem for Linux (WSL)
1. Prerequisites
WSL requires Windows 10, Version 1903 or higher, with Build 18362 or higher, for x64 systems, and Version 2004 or higher,
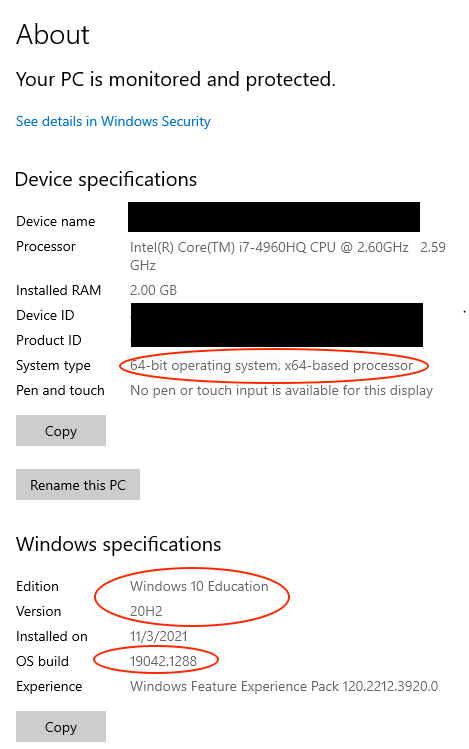
with Build 19041 or higher, for ARM64 systemsTo find your machine's architecture and Windows version/build number go to:
Settings > System > About
 |
2. Enable the Windows Subsystem for Linux feature
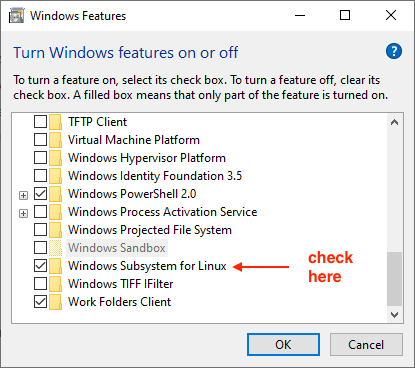
The easiest way to enable the feature is using the GUI
go to Start Menu, and search “Turn Windows feature on or off”
select Windows Subsystem for Linux and click OK
 |
3. After enabling Windows Subsystem for Linux, restart your computer when prompted
4. Install your Linux distribution of choice
Open the Microsoft Store and select the latest LTS Ubuntu Linux distribution available
5. Create a UNIX user
the first time you launch a Linux distribution in Windows, you will be prompted to create a UNIX username and password.
this UNIX username and password has no relationship to your Windows username and password, so to avoid any confusion use a different username
(example: utalarico)
6. Update the Linux distribution
sudo apt-get update && sudo apt-get upgrade -y && sudo apt-get dist-upgrade -y && sudo apt-get autoremove -y
The -y flag signifies automatic yes to any prompts that may come up in the command line
7. Accessing the Windows filesystem from WSL
To make it easier to access your Windows user directory, consider adding a symbolic link, such as:
ln -s /mnt/c/Users/<windowsusername> ~/winhome
(example of windowsusername: ctalarico)
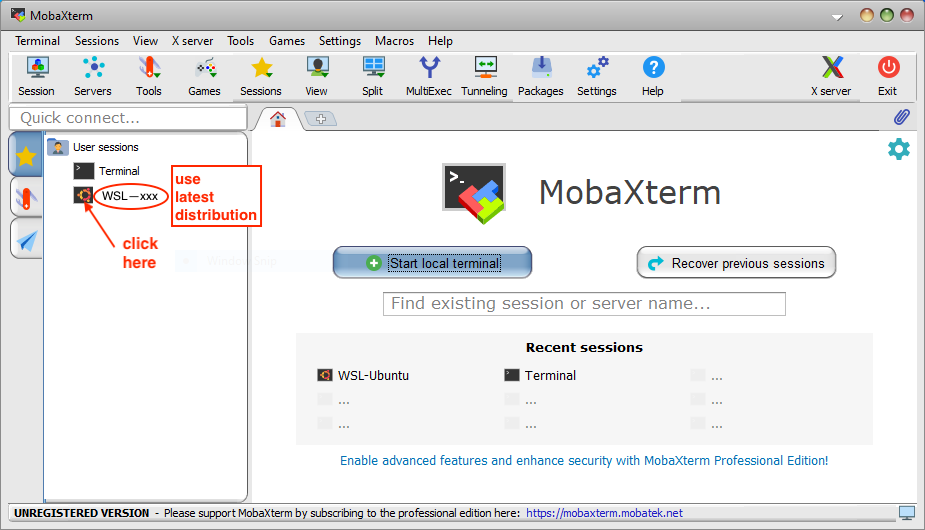
8. Starting up WSL
in general, to start using WSL, open up a PowerShell terminal and type wsl. If you’ve set up WSL correctly, you’ll enter a bash terminal running on
the WSL distro of choice. From here, you can run any Linux commands you wish.in our specific case, since we have installed mobaXterm we can also start the WSL terminal through MobaXterm
 |
9. Graphical Applications
To run Linux GUI applications using WSL, you must:
install an X server for Windows
configure bash to tell the GUIs applications to use the local X server
Method 1:
Don't do anything: take advantage of the Xserver provided by mobaXterm.
the configuration of the Xserver is directly handled by mobaxterm.
Method 2:
since to run graphical Linux applications, you need an X server, install VcXsrv.
VcXsrv is the only fully open source and up-do-date native X server for Windows.
download and run the latest installer, then locate the XLaunch shortcut in the Start Menu, and click it.
configure the bash shell to use the local X server:
in bash run:
echo "export DISPLAY=localhost:0.0" >> ~/.bashrc
and then to have the configuration changes take effect, restart the bash or run:
. ~/.bashrc
Installing magic
The skywater SKY130 PDK requires at least Magic VLSI version 8.3.25.
If the version of magic available through Ubuntu is adequate you can install it using sudo apt install magic.
To install the latest version compile and build magic from the source distribution
1. download the latest source distribution using git
git clone https://github.com/RTimothyEdwards/magic.git git_magic
2. magic requires a number of supporting software packages
build-essential
flex
bison
m4
tcsh
csh
libx11-dev
tcl-dev
tk-dev
libcairo2-dev
libncurses-dev
blt
freeglut3
mesa-common-dev
libgl1-mesa-dev
libglu1-mesa-dev
To check what packages are installed use apt list package-name
To install the missing packages use sudo apt install package-name
The process of installing packages is quite empirical, and depends on the order in which you installed packages on you machine. This is because,
typically, whenever you install a software package, there is also a number of other dependent or recommended packages that will get installed with it.
For example installing the package flex does also install the package gcc that includes the compiler c99 (but this falls “under the radar”).
To check the dependencies of a package you can use apt show package-name or apt rdepends package-name
To check if a program belongs to a certain package you can use dpkg --search file-name or
if the file is not installed you can use apt-file search file-name
Example:
dpkg --search c99
To check all the files in a package you can use apt-file list package-name
4. configure and install magic
cd ~/git_magic
./configure --prefix=/home/<unixusername>/opt/magic
make
make install
The location of magic's binaries is ~/opt/magic/bin
5. create a .bash_profile file and add the location of the magic binaries to the PATH
cd
#!/usr/bin/bash

PATH=${PATH}

# Careful:
# when there is a .bash_profile the WSL terminal does not source .bashrc by default
source ~/.bashrc

# prevent "Warning: Missing charset in String to FontSet conversion"
export LC_ALL=C

# magic: binaries location
MAGIC_BIN=$HOME/opt/magic/bin

PATH="$MAGIC_BIN:$PATH"

# eliminate duplicates from the PATH
PATH=$(echo $PATH | gawk -F: '
{ for (i = 1; i <= NF; i++) arr[$i]; }
END { for (i in arr) printf "%s:" , i; printf "\n"; } ')

# and finally export the PATH
export PATH="$PATH"
Installing ngspice
The skywater SKY130 PDK requires at least ngspice version 34.
If the version of ngspice available through Ubuntu is adequate you can install it using sudo apt install ngspice.
To install the latest version download and compile ngspice from the source distribution
1. download ngspice-<xx>.tar.gz from here
(replace <xx> with the ngspice's version number you want to install, for example 38)
2. expand ngspice-<xx>.tar.gz into your home directory
tar xvfz ngspice-<xx>-tar.gz -C ~
3. ngspice requires a number of packages
build-essential
flex
bison
libx11-6
libx11-dev
libxaw7
libxaw7-dev
fontconfig
libxft-dev
libxft2
libcairo2
libcairo2-dev
libxmu6
libxext-dev
libxext6
libxrender1
libxrender-dev
libtool
readline-common
libreadline-dev
gawk
To check what packages are installed use apt list package-name
To install the missing packages use sudo apt install package-name
4. browse to the location of ngspice's source files and configure and compile them
cd ~/ngspice-<xx>
mkdir release
cd release
../configure --with-x --enable-xspice --disable-debug --enable-cider --with-readline=yes --enable-openmp --prefix=/home/<unixusername>/opt/ngspice
make 2>&1 | tee make.log
make install
The location of ngspice's binary is ~/opt/ngspice/bin
5. edit the .bash_profile file and add the ngspice's binary location to the PATH
cd
#!/usr/bin/bash

PATH=${PATH}

# Careful:
# when there is a .bash_profile the WSL terminal does not source .bashrc by default
source ~/.bashrc

# prevent "Warning: Missing charset in String to FontSet conversion"
export LC_ALL=C

# magic: binaries location
MAGIC_BIN=$HOME/opt/magic/bin

# ngspice: binaries location
NGSPICE_BIN=$HOME/opt/ngspice/bin

PATH="$NGSPICE_BIN:$MAGIC_BIN:$PATH"

# eliminate duplicates from the PATH
PATH=$(echo $PATH | gawk -F: '
{ for (i = 1; i <= NF; i++) arr[$i]; }
END { for (i in arr) printf "%s:" , i; printf "\n"; } ')

# and finally export the PATH
export PATH="$PATH"
“Aside” for Mac Users only
In this case, Windows 10 is a Virtual Machine. Since VMs do sometimes break (for example when the host OS X gets an update) it is not a good idea to save your work
on the VM. Instead, is advisable to store your work either on the Mac's hard drive or on a cloud storage service (e.g. OneDrive, Google Drive or iCloud drive).
The first option (saving the data on the Mac's hard drive) poses some visibility challenge. Since the Linux account (WSL) has no relationship to the Windows account,
the WSL account does not see the Mac OS Shared Folders provided through the VM mechanism.
Diversely, MobaXterm does not have any issue to access the Mac OS Shared Folders
(this is because MobaXterm is a Linux emulator not a full Linux System environment)
Accessing Linux files (WSL) from windows 10 is also not an issue:
From the WSL command line interface run
cd ~
explorer.exe .
This will launch File Explorer showing the current linux directory
> Network > wsl$ > Ubuntu > home > unixusername
1. How to make a folder on the Mac's hard drive accessible to WSL
a. on the Mac OS
select System Preferences > Users & Groups
add the windows OS user’ (example: ctalarico)
b. on the Mac OS
select System Preferences > Sharing
turn on the File Sharing Service
add the folder you want to share to the list of Shared Folder
add the windows user to the list of Users that can access the Shared Folders
shared folders can be accessed through samba at smb://some_address
c. on the Windows OS
select Explorer > This PC > Computer > Map Network drive
set the drive field to one of the available letters (example U:)
set the folder field to \\some_address\foldername
select reconnect to sign in
d. start the WSL terminal
run the command
sudo mkdir -p /mnt/u
sudo mount -t drvfs U: /mnt/u
to make the mounting permanent edit the file /etc/fstab
sudo vi /etc/fstab
add the following line
U: /mnt/u drvfs defaults 0 0
reload the fstab using
sudo mount -a
the owner of the mounted drive is root
to find out the uid and gid of the various users you can use the Linux command
id
for the unix user (example: utalarico) uid=1000 and gid=1000
for the windows user (example: ctalarico) uid=1001 and gid=513
to change the ownership of the mounted drive use:
sudo mount -t drvfs U: /mnt/u -o metadata,uid=1000,gid=1000
to learn how to modify the /etc/fstab for making the mounting permanent
look at how the previous command has modified the /etc/mtab or the /proc/mounts file
copy the corresponding line in the /etc/fstab file
U: /mnt/u drvfs rw,relatime,uid=1000,gid=1000,case=off 0 0
reload the fstab using
sudo mount -a
for convenience create a link to your mac's shared folder
ln -s /mnt/u ~/machome
2. How to access data on a cloud storage service using WSL (example: iCloud)
open the Microsoft store and install iCloud
the files are mounted at:
/mnt/c/Users/<windowsusername>/iCloudDrive/
for convenience create a link to iCloudDrive
ln -s /mnt/c/Users/<windowsusername>/iCloudDrive ~/ihome
A few Linux commands we may need
to do administration as root
sudo -s
to switch to root user
sudo -i
to exit from the root user or the root administrative provileges
exit
to check the linux release you are running
lsb_release -a
to list in long format sorting by time in reverse lexographical order
ls -ltr
to check if a package is installed and what version is available
apt list [package_name]
to check the version of an available package
apt show [package_name]
to create a compressed tarball file
tar -czvf filename.tgz directory
to expand a compressed tarball file
tar -xzvf filename.tgz
to expand a gz file
gzip -dk filename.gz
Installing and “tuning up” xschem
For skywater 130nm PDK integration install at least xschem version 3.0.0
If the version of xschem available through Ubuntu is adequate you can install it using:
sudo apt install xschem
Otherwise, download and compile the latest version from the source distribution
xschem requires a number of supporting software packages
build-essential
flex
bison
libx11-6
libx11-dev
libxcb1
libx11-xcb-dev
libxrender1
libxrender-dev
libcairo2
libcairo2-dev
libxpm4
libxpm-dev
tcl8.6
tcl8.6-dev
tk8.6
tk8.6-dev
gawk
graphicsmagick
vim-gtk3
To check what packages are installed use apt list package-name
To install the missing packages use sudo apt install package-name
Most packages are already presents on the systems since we already installed them for magic and ngspice
Here are the steps for installing, setting up and configuring xschem:
1. download xschem:
cd
git clone https://github.com/StefanSchippers/xschem.git git_xschem
2. configure and install xschem
cd ./git_xschem
./configure --prefix=/home/<unixusername>/opt/xschem
make
make install
the location of xschem's binaries (xschem and rawtovcd) is /home/<unixusername>/opt/xschem/bin
3. edit the .bash_profile file to add the xschem's binaries to the PATH
cd
#!/usr/bin/bash

PATH=${PATH}

# Careful:
# when there is .bash_profile the WSL terminal does not source .bashrc by default
source ~/.bashrc

# prevent "Warning: Missing charset in String to FontSet conversion"
export LC_ALL=C

# magic: binaries location
MAGIC_BIN=$HOME/opt/magic/bin

# ngspice: binaries location
NGSPICE_BIN=$HOME/opt/ngspice/bin

# xschem: binaries location
XSCHEM_BIN=$HOME/opt/xschem/bin

PATH="$XSCHEM_BIN:$NGSPICE_BIN:$MAGIC_BIN:$PATH"

# eliminate duplicates from the PATH
PATH=$(echo $PATH | gawk -F: '
{ for (i = 1; i <= NF; i++) arr[$i]; }
END { for (i in arr) printf "%s:" , i; printf "\n"; } ')

# and finally export the PATH
export PATH="$PATH"
4. xschem and tclsh
xschem relies on the use of tclsh in interactive mode
to use the tab key (for command completion) and the up and down arrow keys (for retrieving commands from the history buffer) we need to install the
package tcl-tclreadline
sudo apt install tcl-tclreadline
and add the following lines to ~/.tclshrc
if {$tcl_interactive} {
    package require tclreadline
    ::tclreadline::Loop
}
5. setting up xschem
xschem default preferences are in the file xschemrc located in the directory xschem_install_dir/share/xschem/
(with xschem_install_dir set to ~/opt/xschem)to customize the default preferences xschem provides a special directory ~/.xschem/
copy the default xschmrc file into ~/.xschem/ and edit it according to your preferences
sample customized xschemrc
...

# CT: 20211201
set XSCHEM_LIBRARY_PATH {}
append XSCHEM_LIBRARY_PATH $env(HOME_DIR)/ngs406/xSchems
append XSCHEM_LIBRARY_PATH :$env(HOME_DIR)/Lib406
append XSCHEM_LIBRARY_PATH :${XSCHEM_SHAREDIR}/xschem_library
append XSCHEM_LIBRARY_PATH :${XSCHEM_SHAREDIR}/xschem_library/devices
append XSCHEM_LIBRARY_PATH :$env(HOME)/share/pdk/sky130A/libs.tech/xschem
# end CT

...

# CT: 20211201
# set XSCHEM_START_WINDOW {sky130_tests/top.sch}
# end CT

...

# CT: 20211201
set netlist_dir $env(HOME_DIR)/ngs406/xSchems
# end CT

...

# CT: 20211201
# uncommented first two lines, added last two lines}
set hspice_netlist 1
set verilog_2001 1
set flat_netlist 0
set netlist_show 1
# CT end

...

# CT: 20211201
# SKYWATER PDK SPECIFIC VARIABLES
set SKYWATER_MODELS $env(HOME)/share/pdk/sky130A/libs.tech/ngspice
set SKYWATER_STDCELLS $env(HOME)/share/pdk/sky130A/libs.ref/sky130_fd_sc_hd/spice
# CT end
modify .bash_profile to add xschem's HOME_DIR location
#!/usr/bin/bash

PATH=${PATH}

# Careful:
# when there is .bash_profile the WSL terminal does not source .bashrc by default
source ~/.bashrc

# prevent "Warning: Missing charset in String to FontSet conversion"
export LC_ALL=C

# magic: binaries location
MAGIC_BIN=$HOME/opt/magic/bin

# ngspice: binaries location
NGSPICE_BIN=$HOME/opt/magic/bin

# xschem: binaries location
XSCHEM_BIN=$HOME/opt/xschem/bin

# setting xschem's HOME_DIR variable
export HOME_DIR=$HOME/ihome

PATH="$XSCHEM_BIN:$NGSPICE_BIN:$MAGIC_BIN:$PATH"

# eliminate duplicates from the PATH
PATH=$(echo $PATH | gawk -F: '
{ for (i = 1; i <= NF; i++) arr[$i]; }
END { for (i in arr) printf "%s:" , i; printf "\n"; } ')

# and finally export the PATH
export PATH="$PATH"
to make sure xschem's variables are set according to you expectations
start xschem and in the tcl shell prompt type the following commands:
puts $XSCHEM_LIBRARY_PATH
puts $XSCHEM_SHAREDIR
puts $USER_CONF_DIR
puts $SKYWATER_MODELS
puts $SKYWATER_STDCELLS
puts $netlist_dir
/home/utalarico/ihome/ngs406/xSchems:/home/utalarico/ihome/Lib406:/home/utalarico/opt/xschem/share/xschem/xschem_library:/home/utalarico/opt/xschem/share/xschem/xschem_library/devices:/home/utalarico/share/pdk/sky130A/libs.tech/xschem

/home/utalarico/opt/xschem/share/xschem

/home/utalarico/.xschem

/home/utalarico/share/pdk/sky130A/libs.tech/ngspice

/home/utalarico/share/pdk/sky130A/libs.ref/sky130_fd_sc_hd/spice

/home/utalarico/ihome/ngs406/xSchems
for further details please look up the documentation and tutorials provided by xschem's author (Stefan Schippers)
6. Circuit simulation and visualization of the output waveforms
For the simulation and visualization of the outputs xschem provides the ability to interface with ngspice and gaw (Gtk Anaog Wave viewer).
7. Installing gaw
gaw (Gtk Analog Wave Viewer) does not come pre-packaged, so it must be installed from source, and in addition it requires the installation of the libgtk-3-dev package.
install the libgtk-3-dev package
sudo apt-get install libgtk-3-dev
download gaw source's code from here
the latest version of gaw (@ 2 Dec. 2021) is ver. 20200922
extract, configure and compile the source code
tar zxvf gaw3-20200922.tar.gz
cd gaw-20200922
./configure
make
sudo make install
the gaw binary file is located at /usr/local/bin/gaw
the first time gaw gets started it creates a directory ~/.gaw containing the preference file gawrc
8. configure xschem for analog simulation (ngspice and gaw)
start xschem
go to Simulation > Configure simulators and tools
edit the configurations for ngspice, ngspice batch, and gaw viewer as follows:
 |
Click on Save Configuration to file
the location of the configuration file is ~/.xschem/simrc
the meaning of the various variables used in the configuration settings is the following:
$N - netlist file full path (example: ~/ihome/ngs406/xSchems/tgate.spice)
$n - netlist file full path with extension chopped (example: ~/ihome/ngs406/xSchems/tgate)
$s - schematic name (example: tgate)
$d - netlist directory (example: ~/ihome/ngs406/xSchems)
for - more details lookup the file ~/opt/xschem/share/xschem/xschem.tcl
9. install the xschem's library for the skywater 130nm PDK
Instead of manually installing the xschem's skywater library from github (git clone https://github.com/StefanSchippers/xschem_sky130.git)
install it directly through the open_pdks as shown here.
The current (@ 3 Dec. 2021) xschem_sky130 examples use the model file locations installed by open_pdks
Install open_pdks and the skywater sky130 PDK
open_pdks aims to create the setups necessary to use open-source PDKs with open-source EDA tools (xschem, ngspice, magic, klayout, netgen, etc.)
open_pdks supports the Google/Skywater SKY130 open process
NOTE: for open_pdks to install the files required by the Magic, Magic must be installed !
use opendesign to install the sky130 PDK and organize the structure of the CAD tools
git clone https://github.com/RTimothyEdwards/open_pdks.git git_open_pdks
cd ~/git_open_pdks
#./configure --enable-sky130-pdk=/home/<unixusername>/skywater-pdk \
#--with-sky130-variants=all --prefix=/home/<unixusername>
./configure --enable-sky130-pdk --with-sky130-variants=all --prefix=/home/<unixusername>
make
make install
The PDK gets installed at the location ~/share/pdk
Libraries in the SKY130 PDK are named using the following scheme:
<Process name>_<Library Source>_<Library Type>
process name:
sky130 = skywater 130nm processslibrary source:
fd = skywater foundrylibrary type:
sc = digital standard cells
io = input/output and periphery cells
pr = basic primitives
hd = high density
hvl = high voltage
hdll = high density low leakage
hs = high speed
ms = medium speed
ls = low speed
lp = low power
make sure the xschem_sky130 library is installed correctly
create an example directory and browse to it
mkdir -p ~/example_xschem_sky130
cd example_xschem_sky130
copy in the example directory the xschem initialization file available in the PDK
cp ~/share/pdk/sky130A/libs.tech/xschem/xschemrc .
create an ngspice initialization file .spiceinit with the following lines:
set ngbehavior=hs
set ng_nomodcheck
set color0=white
set color1=black
set xbrushwidth=2
start xschem
a few useful zoom commands and their shortcuts:
Zoom Full | F
Zoom In | Shift + Z
Zoom Out | Ctrl Z
Zoom Box | Z
select the cell test_nmos and hit the key E to descend into its schematic
double click the Netlist “button”
double click the Simulate “button”
Build your own xschem library
make a directory Lib406 (example: ~/ihome/Lib406)
copy your favorite symbols into the directory
in case you are not satisfied with the look of the existing symbols edit them
here is a sample Lib to get started with